System Requirements
Operating Systems
The DIRSIG software is distributed for the following platforms:
-
The Windows platform
-
OS: Windows 10 and 11
-
Processor: Intel/AMD x86 64-bit
-
Format: Windows MSI installer (
.msi)
-
-
The Linux platform
-
OS: Any 4.x or later kernel with GLIBC 2.28+
-
Processor: Intel/AMD x86 64-bit
-
Format: tar+gzip archive (
.tgz)
-
-
The MacOS platform
-
OS: 14.7 (Sonoma) and 15.x (Sequoia)
-
Processor: Intel x86 64-bit and Apple Silicon 64-bit (ARM64)
-
Format: Disk image (
.dmg) containing the software as a folder to be copied into the systemApplicationsfolder or user folder.
-
Hardware Requirements
| Feature | Recommendation |
|---|---|
CPU |
Modern Intel/AMD/ARM, clock rates > 2 GHz, more cores → better |
Memory (RAM) |
4 GB RAM minimum, 32+ GB RAM for larger simulations |
Storage (disk) |
2 GB minimum for installation plus space for generated data |
Screen Resolution |
1920 x 1080 minimum, 1920 x 1200 (or better) is ideal |
Graphics (GPU) |
No minimum requirement at this time. |
Clarifications:
-
DIRSIG is a multi-threaded application, therefore more CPU cores results in improved computational performance.
-
Large area scenes suitable for some full frame satellite simulations can use as much as 128 GB of memory. Even modest scenes (including MegaScene1, etc.) can easily fit in 4 GB of memory.
-
Storage requirements depend on how much data the user expects to generate.
Software Requirements
The following software is required:
-
MODTRAN
-
A copy of MODTRAN4, MODTRAN5 or MODTRAN6 is required for rigorous atmospheric modeling
-
MODTRAN4 Version 3 Release 1 or later
-
MODTRAN5 2.0.0 or later
-
MODTRAN6 6.0.2 or later
-
-
Read the MODTRAN guide for more information on how to setup DIRSIG to use your copy of MODTRAN.
-
Visit modtran.org for more information on how to obtain a copy of MODTRAN.
-
The DIRSIG software comes with a built-in image viewer, however the following software is recommended for additional image viewing, manipulation and/or processing.
-
A copy of an image exploitation tool such as ENVI or Opticks can provide advanced image/data viewing and analysis of the image files produced by DIRSIG.
-
A copy of a LIDAR exploitation tool such as MARS FreeView or QuickTerrain Reader can provide advanced viewing and analysis of LAS format 3D point clouds produced by DIRSIG.
Execution Requirements
The following clarifications might be useful to system administrators:
-
DIRSIG does not need "administrator" privileges to run. The end user simply needs:
-
Execute permissions for the programs, and
-
Read-only access to the support files included in the installation.
-
-
DIRSIG does not have any "phone home" mechanisms (for example, to check for software updates)
-
The default option is to use the HTML documentation installed with the software. However the end-user can change that to access the HTML documentation source on the DIRSIG website.
-
Installation
A standard DIRSIG release contains the following:
-
A set of executable programs
-
A collection of HTML-formatted support documents
-
A set of demonstration (example) simulations
-
A folder of "extras" that include Matlab and Blender scripts for various tasks.
General File and Folder Layout
A DIRSIG release includes a copy of the latest DIRSIG4 (maintenance updates only) and DIRSIG5 (active development).
- The
binfolder -
This folder contains a full set of the DIRSIG programs.
- The
demosfolder -
This folder contains the standard DIRSIG demos.
- The
docsfolder -
This folder contains all of the DIRSIG documentation, including release notes and this document.
- The
extrafolder -
This folder contains various "extras" including the Blender plugins, BIN file reader for Matlab and MODTRAN6 wrapper that can be used with Linux and MacOS to resolve shared library location issues.
- The
libfolder -
This folder (not present on Windows) contains the dynamic (shared) libraries that are used by the executables. On Windows, all dynamic libraries (DLLs) are in the
binfolder. - The
pluginsfolder -
This folder contains all the DIRSIG5 plugins that provide most of the functional utility to the radiometry core. This currently includes sensor models and atmospheric plugins.
Windows
The DIRSIG software is released on the Windows platform as a
traditional Windows installer (with a .msi extension). Simply
double-click the installer file and follow the standard directions
to install the software. The DIRSIG installer is signed with RIT’s
"Code Signing Certificate" to indicate that it was indeed produced
by RIT. However, Windows Defender SmartScreen may still flag the
installer as "unrecognized" because RIT does not also have a
"Extended Validation (EV) Code Signing Certificate".
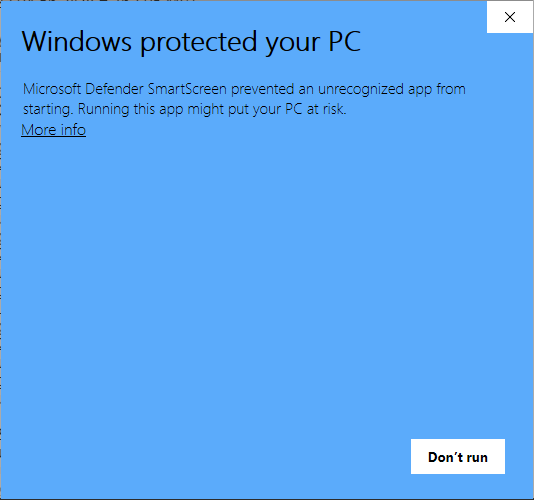
Hence, the user might be required to tell Windows Defender that the application is recognized by clicking on the More Info hyper-link, verifying the installer and publisher and then clicking the Run Anyway button:

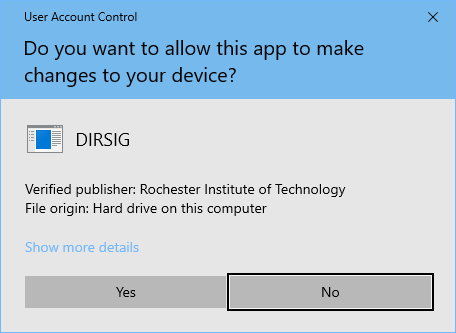
Finally, a Windows User Access Control (UAC) dialog should appear that confirms you want to proceed with the installation:
The default install location for DIRSIG is the C:\Program Files\DIRSIG
folder.
Linux
The DIRSIG software for the LINUX platform is released as a tar+gzip archive that contains the program executables, supplemental data, basic scenes, etc. The installation of the software is as simple as choosing a location, unpacking the archive into that location, and setting up your user environment.
There are no requirements or assumptions about where the DIRSIG
installation will be located. An administrator with the correct
permissions can install DIRSIG in a common area (for example,
/usr/local or /opt) so that multiple users can access the single
installation. A single user without special permissions can install
DIRSIG in a directory in their account.
For the remainder of this explanation, we will assume that the DIRSIG
software will be installed in /opt/rit/dirsig (which will most
likely require superuser permissions) and that the DIRSIG installation
archive file is located in the /tmp (the user can obviously adapt
these instructions to deal with the installation destination or
source archive file being in any location).
|
|
The choice of /opt/rit/dirsig as the installation folder
is just an example. Any accessible folder is valid.
|
To create the installation directory, execute the following command:
$ mkdir /opt/rit/dirsigThen, make sure you are at the top of your installation directory:
$ cd /opt/rit/dirsigThen unpack the DIRSIG installation archive. On the LINUX platform
this can be done using the tar command (which has gzip compression
support built-in):
$ tar -xzvf /tmp/dirsig-2021.42.0.8021a56.tar.gz
./
./bin/
./bin/bulldozer
./bin/dirsig4
./bin/dirsig5
./bin/DIRSIG
.
.
MacOS
The DIRSIG software is released on the MacOS platform as a single application bundle. The software is installed like many MacOS software packages:
-
Mount the disk image by double-clicking on the
.dmgfile. -
Open the mounted disk image in Finder (it should have appeared as a new volume after you mounted it).
-
Drag the
DIRSIG.appapplication bundle into the systemApplicationsfolder (which will require admin privileges), the user’sApplicationsfolder, or any accessible folder. -
Double-click on the application bundle to start the graphical user interface (GUI).
-
If you plan on using DIRSIG via the command-line, then you will need to modify your login files to include
[InstallFolder]/DIRSIG.app/Contents/Applicationsfolder in your path (where[InstallFolder]reflects the location of the DIRSIG app, e.g.,/Applications, etc.).
|
|
As of the 2022.47 release, the DIRSIG application bundle (aka
DIRSIG.app) has been signed and notarized by Apple and should
not need any additional permissions or executable exceptions or
overrides to run.
|
Optional DIRSIG5 Site Configuration
There is an optional installation configuration file that allows the installation administrator to control some key parameters for all users. These parameters generally control how compute resources are utilized by individual users.
The INI formatted configuration
file is called dirsig.ini and needs to be placed in the top of
the installation folder (at the same level that the bin, plugins,
etc. folders are located). If the file does not exist or a given
parameter is not present, a set of default values are used. An
example file is shown below:
[General]
max_threads=8
default_threads=4max_threads-
Defines the maximum number of threads that can be started by an individual simulation. The default value is the number of virtual cores present.
default_threads-
Defines the default number of threads started by an individual simulation. The default value is the maximum number of threads. This number can be overridden for a simulation by the
--threadscommand-line option. If the number of requested threads exceeds the maximum, an error is issued.
The idea behind the maximum and default thread count parameters is to help the installation administrator manage a compute resource being shared by many users and/or services. For example, you might have a machine with 32 cores and many users. Without setting the maximum thread parameter, a single user could start up a simulation that spawns a massive number of threads, leaving very few resources for other users. The maximum value is to define the maximum number of threads a single user could ever launch from a single simulation.
|
|
This parameter does not span processes or replace operating system level resource management. A single user could still launch multiple simulations that use additional thread pools. |
The default thread count is the number of threads used by any simulation.
This value can be less than the maximum if you want to create an
environment where users can request more threads if needed (via the
--threads command-line option), but by default they use a modest amount.
Upgrading
This section outlines the process to upgrade an existing DIRSIG installation to a newer release.
|
|
If you are upgrading from DIRSIG 4.4 or earlier, it is strongly recommended that you uninstall DIRSIG prior to installing DIRSIG 4.5 or later. |
|
|
If you are upgrading from DIRSIG 4.4 or earlier, MacOS
users should delete the DIRSIG_HOME key/string pair from
your ~/.MacOSX/environment.plist file (which is no longer required). This task can be performed with a .plist file
capable editor such as TextWrangler or Xcode.
|
|
|
The default behavior of most installers is to replace a previous installation with the new version. If you want to keep a copy of the previous version when you install a new version, the best approach is to make a copy of the installation prior to installing the new version. |
Windows
The .msi installer can be run directly as outlined in the
Installation section above. Installing an update will replace
the previous version of DIRSIG.
Linux
The recommended option for upgrades is to
create a whole new installation directory for each installation.
In this approach, rather than installing to /opt/rit/dirsig, the
user might unpack into /opt/rit/dirsig-2021.42.0.8021a56.
When the 2021.xx release arrives, the user can unpack that release into
/opt/rit/dirsig-2021.xx.0.yyyyyy. To simplify this scheme for users, you
might consider making a symbolic link called /opt/rit/dirsig that
always points to the current installation directory. Again, the
installing user will want to purge old installation folders over
time.
MacOS
To keep an previous version of the software, the process is straightforward.
Since the installation is a simple drag and drop process, the user
can rename an older installation folder (for example, DIRSIG →
DIRSIG-2021.42) prior to copying the new version.
Using the Software
First time users will be greeted with the DIRSIG User Setup Wizard the first time they start the graphical user interface. This wizard will guide them through the process of setting up their personal settings, including telling DIRSIG where MODTRAN is installed. More information about setting up DIRSIG to use MODTRAN is discussed below.
MODTRAN Setup
Starting in DIRSIG 4.5, information required by DIRSIG to locate and run MODTRAN is stored in each user’s personal settings. This new method allows each user to configure multiple MODTRAN installations, and then select which MODTRAN installation is used during a given simulation.
|
|
A given user’s list of MODTRAN installation profiles might include stable versus experimental versions of MODTRAN. |
First time DIRSIG users will be prompted by the DIRSIG User Setup Wizard to configure a MODTRAN installation profile. In addition, users can always add, remove or modify a MODTRAN installation profile via MODTRAN tab in the Preferences window for the user interface.
Each installation profile requires three pieces of information:
-
The path to the MODTRAN executable file
-
The path to the MODTRAN
DATAfolder -
The minimum spectral delta supported by that version
-
This is 1 wavenumber (1/cm) for MODTRAN4 and 0.1 wavenumber (1/cm) for MODTRAN5 and MODTRAN6.
-
|
|
The standard Windows distribution of MODTRAN5 can contain two
executables: one ending with qwin.exe and one ending with
cons.exe. You must select the cons.exe version (which
is a "console only" application suitable for being called by
other programs) for use with DIRSIG.
|
|
|
The standard MacOS distribution of MODTRAN5 has dependencies on dynamic libraries that are included with the distribution. However, to run MODTRAN5 from outside the installation folder (which is required by DIRSIG), then you should consult this note. |
If you are having problems with DIRSIG integrating with MODTRAN, consult the MODTRAN Integration Guide and the Troubleshooting Guide.
Command-Line Usage
DIRSIG is distributed with a graphical user interface (GUI) that allows the user to configure and run a DIRSIG simulation without using any command-line tools. However, there are still many reasons you might want to run a DIRSIG simulation from the command-line. To learn more about the command-line aspects of the model, consult the DIRSIG5 Command-Line Guide.
Windows
The Windows installer should have automatically added the folder containing the DIRSIG executables to the path used in the CMD and PowerShell environments.
Linux and MacOS
If you want to run DIRSIG from the command line then your login
shell will need to have the path to the DIRSIG executables configured.
The default shell for many accounts on Linux is bash, but many
users use csh or tcsh. The automatic setup of environment
variables in your login shell is slightly different for each shell,
but the general requirements for each are the same. If you are a
novice at setting up your shell environment, consult the documentation
for the shell you are using or ask an experienced user or administrator.